Introduction to Unreal Engine Classes
In the world of game development, Unreal Engine stands tall as a powerhouse, offering rich features and a robust framework. If you’re delving into Unreal Engine, coupled with the power of C++, you’ve embarked on a path that’s as rewarding as it is challenging. For beginners, understanding how to seamlessly integrate Unreal Engine classes into a C++ project can be daunting. This guide aims to simplify the process, making it accessible to all, even those without prior knowledge.
Understanding Unreal Engine and C++
Unreal Engine is a widely-used game engine known for its real-time 3D creation and unparalleled graphics quality. It’s a preferred choice for developing AAA games. Combining Unreal Engine with C++ enhances performance, allowing you to leverage object-oriented programming for robust game logic.
Getting Started with Visual Studio 2022
Visual Studio 2022 is the recommended Integrated Development Environment (IDE) for Unreal Engine C++ projects. It provides a comprehensive suite of tools for developing, debugging, and packaging your game. Before adding classes, ensure you have:
- Visual Studio 2022 Installed: With the Game Development with C++ workload.
- Unreal Engine Installed: Download the latest version compatible with your game.

Adding Unreal Engine Classes to Your C++ Project
Let’s dive into the core of adding Unreal Engine classes to your C++ project using Visual Studio 2022. Follow these straightforward steps:
Step 1: Open Your Project in Visual Studio
Begin by launching Visual Studio and loading your existing Unreal Engine C++ project. If this is your first project, you may need to create one via the Unreal Engine launcher.
Step 2: Access the Add Class Dialog
- Navigate to the Solution Explorer on the right panel.
- Right-click on your project, hover over Add, then select New Item.
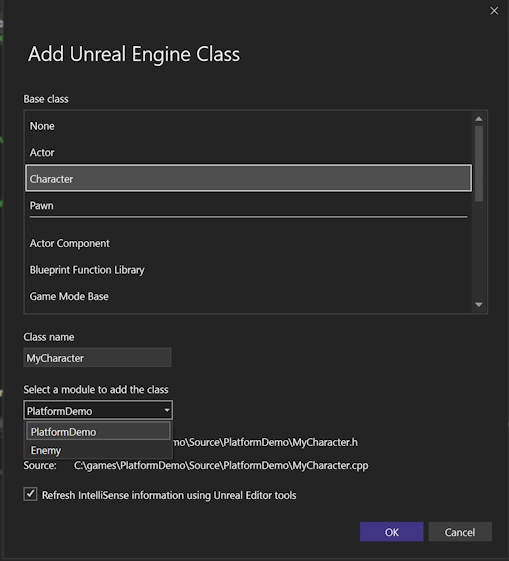
Step 3: Use the Add Unreal Engine Class Dialog
A dialog will appear specifically designed for adding Unreal Engine classes. Here’s how to navigate it:
- Choose Your Class Type: You’ll see options like Actor, Pawn, or Character. Select the one that suits your project’s needs.
- Name Your Class: Give your class a descriptive name, ensuring it aligns with your game’s functionality.
- Module Selection: Select the module where the class will be added. Good organization from the start keeps your code manageable.
Step 4: Complete the Setup
Once you’ve made your selections, click Add. Visual Studio will then generate the necessary header (.h) and source (.cpp) files for your new class. These files will be added to your project’s appropriate directories.
Step 5: Implement Your Class Logic
Now, it’s time to write the logic for your game. Implement the functionalities in the respective .cpp and .h files. Remember, starting simple can help in understanding and debugging.
Exploring Unreal Engine Classes and Modular Programming
Unreal Engine is designed to facilitate modular programming. Each class serves distinct purposes, contributing to a structured and efficient codebase. Here’s a quick glance at some common Unreal Engine classes:
| Class Type | Description |
|---|---|
| Actor | The basic unit of gameplay, any object in your game. |
| Pawn | Characters or objects that can be controlled. |
| Character | A subclass of Pawn, intended for humanoid forms. |
| Controller | Handles input and AI, associated with a Pawn or Character. |
Modules in Unreal Engine allow you to split your game into logical parts, enhancing maintainability and scalability. Each module can encapsulate specific functionalities, making collaborative work more seamless.
Organizing Your Unreal Engine Code
Good organization is vital in any software project. Visual Studio 2022 assists in maintaining a clean structure:
- Folder Groups: Use folders to categorize your classes by functionality (e.g., Player, Enemy).
- Naming Conventions: Follow consistent naming conventions to easily identify class types and responsibilities.
- Documentation: Comment your code where necessary to explain complex logic.
Conclusion
Integrating Unreal Engine classes into a C++ project has never been easier, especially with tools like Visual Studio 2022. By following the steps outlined above, not only do you ensure a smoother development process, but you also lay a strong foundation for a successful game. Embrace the synergy of Unreal Engine and C++ to bring your creative visions to life.
Frequently Asked Questions (FAQs)
How to add Unreal Engine classes in Visual Studio 2022?
To add Unreal Engine classes, open your project in Visual Studio, right-click the project in Solution Explorer, and select Add > New Item to access the Add Unreal Engine Class Dialog.
What are the benefits of using the Add Unreal Engine Class dialog?
The dialog streamlines the process of creating new classes, ensuring they are correctly configured with Unreal Engine’s architecture, saving time and reducing errors.
How do modules work in Unreal Engine?
Modules are like containers for code, helping to organize and encapsulate functionalities, making your project scalable and maintainable.
How to organize Unreal Engine code in Visual Studio?
Use folders for different functionalities, adhere to consistent naming conventions, and comment your code for clarity. This will help maintain organization in your project.
What are Unreal Engine common classes?
Common classes include Actor, which is the base for all game objects, and Pawn, used for characters or objects controlled by a player or AI, among others.
References & Read More:
- Dynamics 365 Customer Insights Email Marketing Metrics
- Mastering Business Central Location Setup: A Comprehensive Guide for Beginners
- Understanding Financial Reports in Business Central: Step by Step Beginner’s Guide
- Microsoft Business Applications Launch Event 2024
- Comprehensive Guide to Setting Up Currencies in Business Central
