Have you ever wondered how to add an alert dialog in your Microsoft Dynamics 365 Model-Driven Apps using JavaScript? If you’re fairly new to this concept, don’t worry! This article will break down everything you need to know in plain, easy-to-understand language. By the end of this read, you’ll be able to use `openAlertDialog` in your Dynamics 365 environment like a pro.
Understanding the Syntax of openAlertDialog (Client API reference) in model-driven apps
The `openAlertDialog` method is used to display a dialog box that contains a message and a button. Let’s start by understanding the syntax:
Xrm.Navigation.openAlertDialog(alertStrings, alertOptions).then(successCallback, errorCallback);This method accepts a series of parameters to customize the alert dialog box. Don’t fret over the complexities; we will break them down next.

Parameters Breakdown
Here’s a detailed explanation of each parameter you’ll come across:
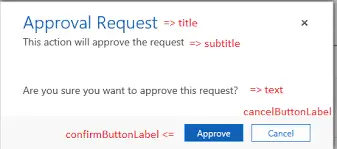
1. alertStrings (Required: Yes) This object holds the strings used in the alert dialog. It includes the following properties:
- confirmButtonLabel: (Optional) This is the label for the confirm button, typically “OK” if not specified.
- text: The message to be displayed in the alert dialog.
- title: (Optional) The title of the alert dialog.
2. alertOptions (Required: No) This object contains settings for the dialog’s dimensions:
- height: (Optional) The height of the alert dialog in pixels.
- width: (Optional) The width of the alert dialog in pixels.
3. successCallback (Required: No) This function executes when the alert dialog closes, either by confirming or canceling the dialog.
4. errorCallback (Required: No) This function executes when the operation fails.
Example: Implementing Alert on Load
Let’s look at an example to make things clearer. Suppose you want to show an alert when you open an Account record:
function ShowAlertDialog(message, title, hgt, wdh) {
"use strict";
var alertStrings = { confirmButtonLabel: "OK", text: message, title: title };
var alertOptions = { height: hgt, width: wdh };

Xrm.Navigation.openAlertDialog(alertStrings, alertOptions).then(
function (success) {
console.log("Alert dialog closed");
},
function (error) {
console.log(error.message);
}
);
}
Here’s a step-by-step guide to configure this in your Dynamics 365 environment:
- Navigate to Account Form: Open the main form of the account where you wish to add the alert.
- OnLoad Event: Add an OnLoad event to trigger the `ShowAlertDialog` function when the form loads.
- Implement the Code: Insert the above JavaScript code into a web resource and link it to the OnLoad event.
Once configured, an alert dialog will appear every time an Account record is opened.
Why Use openAlertDialog?
You might wonder why all this effort is necessary. Here are some benefits of using `openAlertDialog`:

- User Interaction: Alerts help engage users by displaying essential messages they need to take note of.
- Customization: Tailor the dialog to fit the context of the message, making it more meaningful.
- Call to Action: Encourage users to take a specific action, like confirming a task or being aware of crucial information.
Conclusion
Integrating alert dialogs using `openAlertDialog` in your Model-Driven Apps can significantly enhance user interaction and ensure that crucial messages are conveyed effectively. Although it might seem complicated initially, the method is quite simple once you break it down.
Feel free to revisit this guide whenever you need a refresher. With practice, you can master the use of alert dialogs in Dynamics 365 and improve your application’s usability.
Thank you for reading! Please like, share, and provide your valuable feedback. Subscribe to get more insightful articles straight to your inbox.
FAQs
Q: Can I customize the appearance of the alert dialog?
A: Yes, you can customize aspects like height and width using the `alertOptions` object.
Q: What happens if I don’t set the confirmButtonLabel?
A: If you don’t specify, “OK” will be used as the default label for the confirm button.
Q: What should I do if the alert dialog fails to open?
A: Use the `errorCallback` function to capture and handle errors. This will help you debug any issues.
Q: Is it possible to include multiple buttons in the alert dialog?
A: Currently, `openAlertDialog` supports only a single confirm button, but for more complex interactions, consider using custom dialogs.
Q: How can I trigger the alert dialog under different conditions?
A: You can integrate `ShowAlertDialog` within various form events like OnLoad, OnSave, or OnChange to trigger under specific conditions.
#MSFTAdvocate #AbhishekDhoriya #LearnWithAbhishekDhoriya #DynamixAcademy
References & Read More
- Official Documentation : https://learn.microsoft.com/en-us/power-apps/developer/model-driven-apps/clientapi/reference/xrm-navigation/openalertdialog
- Comprehensive Guide : Mobile Offline Profile feature in Dynamics 365 Model-driven apps
- How to Retrieve Multiple Records Using Web API in Dynamics 365 Version 9.0?
- Entity Ownership in Dynamics 365 CRM Interview Questions and Answers
- What is TDS Endpoint in Dynamics 365 CE? A Comprehensive Guide
- Unlocking the Future: How Microsoft’s AI-Powered Tools are Revolutionizing Scientific Discovery

3 thoughts on “Unlock the Power of Model-Driven Apps: A Beginner’s Guide to openAlertDialog in Microsoft Dynamics 365”