Creating and managing topics in Copilot Studio is a crucial skill for anyone looking to build effective and responsive virtual agents, also known as copilots. This detailed guide will walk you through the process, making it easy for non-developers and freshers in the tech industry to understand and implement. By the end of this article, you’ll have a solid grasp of how to leverage Microsoft Copilot Studio to create intelligent virtual agents that can handle a variety of tasks, ensuring a seamless and efficient user experience.
Introduction to Copilot Studio
In today’s fast-paced business environment, intelligent virtual agents, or copilots, are becoming increasingly important. These virtual agents help ease the workload of human agents by handling specific types of calls, gathering customer information, resolving complaints, executing actions, and more. Microsoft Copilot Studio allows users to create these copilots, which use artificial intelligence to understand customer intent and provide relevant responses. For example, a copilot can help a customer check their account balance, book a hotel room, or even escalate the conversation to a live agent if needed.
What Are Topics in Copilot Studio?
Topics in Microsoft Copilot Studio are the building blocks of your virtual agent’s conversations. Think of a topic as a small, focused conversation on a specific subject. Each topic includes trigger phrases and conversation nodes that guide the interaction based on user input. For instance, a topic could handle inquiries about the weather, account details, or product returns. By defining multiple topics within a single copilot, you can create a flexible virtual agent that can engage with customers on a wide range of subjects.
Creating Topics in Copilot Studio
Creating topics in Microsoft Copilot Studio involves several key steps:
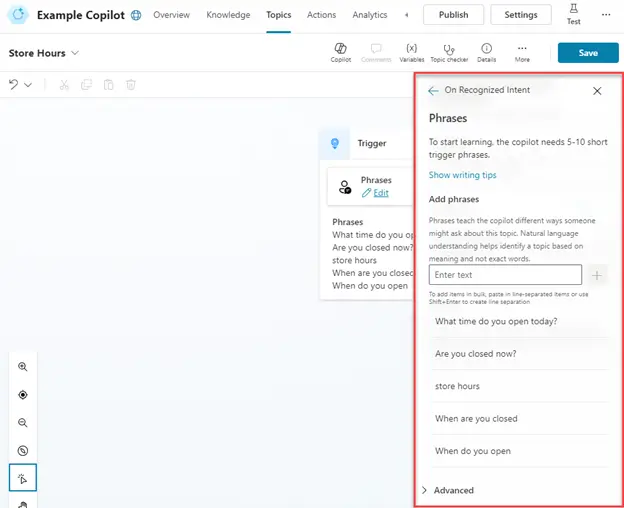
- Define Trigger Phrases: Trigger phrases are the phrases or keywords that initiate a topic. For example, if a customer asks, “What are your hours?” this could trigger a topic about store hours. It’s important to think about how customers might phrase their requests and include multiple trigger phrases to cover different variations.
- Design Conversation Paths: Once you’ve defined the trigger phrases, the next step is to design the conversation path. This involves using conversation nodes to define how the bot should respond. Nodes can display messages, ask questions, or perform actions. For example, if a customer asks about the weather, the bot might ask for their location and then provide a weather forecast.
- Add Branching: Branching allows the conversation to follow different paths based on user responses. This ensures that the interaction is personalized and relevant. For example, if a customer asks about returning a product, the bot might ask whether the product is defective or if it’s a recall, and then guide the customer through the appropriate process.
Managing Topics in Copilot Studio
Effective topic management is essential for ensuring that your copilot functions smoothly and provides a great user experience. Here are some key aspects of managing topics in Microsoft Copilot Studio:
- System Topics: These are predefined topics such as greetings, goodbyes, and escalations. You can customize these topics to fit your specific needs. For example, you might want to personalize the greeting to include the customer’s name or provide specific information based on the time of day.
- Fallback Topics: Fallback topics are used to handle unrecognized input. If the bot doesn’t understand what the user is asking, it can guide the user back on track by asking clarifying questions or providing category options. This helps ensure that the conversation continues smoothly even when the bot doesn’t immediately understand the user’s intent.
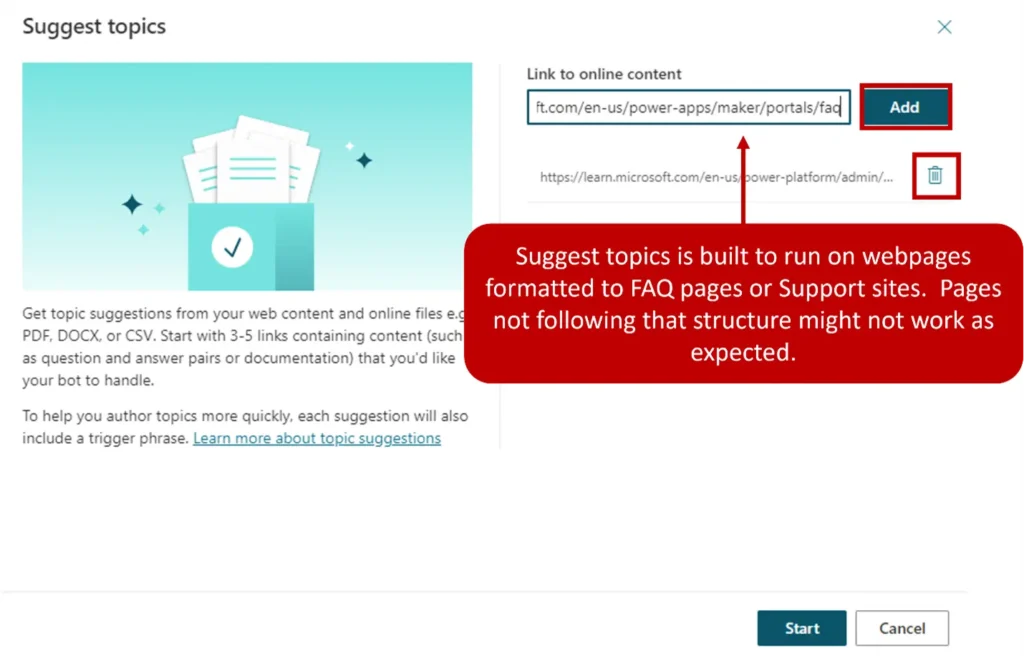
- Content Extraction: Microsoft Copilot Studio includes AI-assisted authoring, which allows you to automatically create topics from existing FAQ or support pages. This can save time and ensure that your topics are aligned with the types of issues that customers are reporting.
Essential Copilot Studio Tips and Tricks: How to Use Microsoft Copilot Studio Efficiently?
To maximize your experience, consider these tips:
- Regular Training: Familiarize yourself with Copilot Studio’s training resources to ensure you’re utilizing all features optimally.
- Feedback Loop: Establish a process for collecting feedback from team members to continuously improve how projects are managed within Copilot Studio.
- Leverage Community Support: Engage with the Copilot Studio community for tips, tricks, and shared experiences.
Microsoft Copilot Studio Features
Below is a comparison table of key features offered by Copilot Studio:
| Feature | Description |
|---|---|
| Automation Tools | Reduces repetitive tasks through automation, enhancing efficiency. Streamline tasks to save time and reduce errors. |
| Integration Capabilities | Seamlessly connect with other applications. Easily integrates with other Microsoft applications and third-party tools, ensuring smooth data transition. |
| Analytics Dashboard | Provides insightful data analytics to track performance and progress of projects. Track project progress with data insights. |
| Secure Environment | Ensures all data is protected using state-of-the-art security protocols. Keep your data safe with advanced security measures. |
Advanced Features
Microsoft Copilot Studio offers several advanced features that can enhance the functionality of your virtual agent:
- Adaptive Cards: Adaptive Cards are platform-agnostic cards that can be tailored to your needs. They allow you to create rich, interactive content within your bot. For example, you could create a weather card that includes graphics and animations to display forecasts in more detail.
- Power Automate Flows: Power Automate Flows allow you to integrate your bot with external systems to perform actions such as sending emails, retrieving data, or creating activities based on user input. This can greatly enhance the capabilities of your virtual agent.
- Error Management: The Topic Checker in Microsoft Copilot Studio validates your topics and shows any errors or warnings. This helps ensure that your bot functions correctly and provides a smooth user experience. Errors need to be addressed to avoid unexpected behavior, while warnings indicate areas that could be improved.
Steps by Step Creating and Managing Topics in Copilot Studio
- Work with Bot Topics: Topics represent paths a customer can take while interacting with a copilot. The topic used and the path followed within an individual topic are determined by the data typed in by customers in the conversation panel. Topics are the primary element that dictates how conversations flow. For example, if a customer asks about the weather, the copilot can launch a weather topic and ask questions defined in the topic, such as the customer’s city, to provide a personalized weather forecast.
- Work with Topic Triggers: The first thing you need to define in a topic is what phrases the copilot should look for, which triggers the topic. Trigger phrases are added by selecting “Edit” next to Phrases. A single topic can have multiple trigger phrases defined for it. Having five to ten trigger phrases is a good starting point, but you can add as many as needed. Punctuation can be used in trigger phrases, but it’s best to use short phrases rather than long sentences. Try to think about how a customer might phrase their request.
- Use Conversation Nodes to Design the Topic’s Conversation Path: Once you define how the topic is triggered, you need to design the flow of the topic as users interact with it. This is called a conversation path. A topic’s conversation path defines how the customer is interacted with and what occurs based on customer input. You can edit a topic conversation path by closing the trigger phrases pane. At any point, you can return to the trigger phrase pane by selecting “Phrases” on the Trigger node.
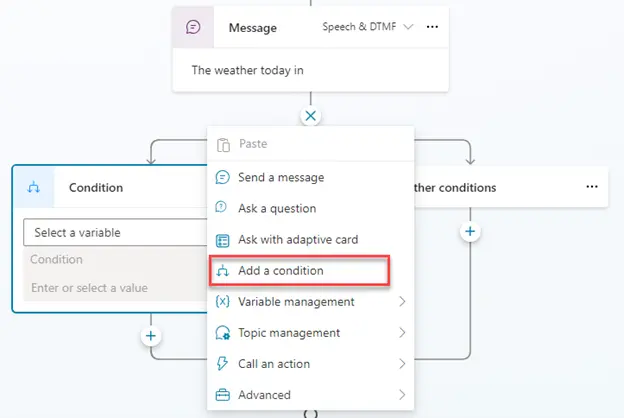
- Work with Conversation Nodes: Conversation nodes represent customer interactions or actions that can be inserted into a topic’s conversation path. They might be used to display a message to the customer, ask them for additional information, trigger an automation, or escalate to a live agent. There are several different node types available, including “Send a message,” “Ask a question,” “Ask with adaptive card,” “Add a condition,” “Variable management,” “Topic management,” “Call an action,” and “Advanced.”
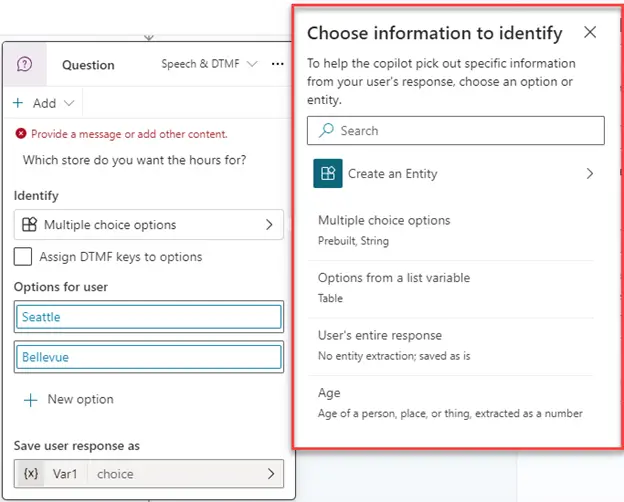
- Work with the Question Node: Question nodes are often used in conversation paths to capture additional information from customers. Information captured from the question can be stored and used in other parts of the copilot or in automation. They can also affect the path the customer is taken on. For example, you might use a question node to capture the city a customer lives in or provide a list of multiple-choice options for the customer to choose from.
- Configure Question Behavior: Another aspect of creating questions is defining question behavior properties. These properties provide you with more detailed control over different aspects of the Question node, such as how the copilot handles an invalid response or how it validates user input. For example, when creating a reservation question, you might want to limit the number of people they can request the reservation for.
- Display Messages with the Show a Message Node: Message nodes are used anytime you want to provide some details or information back to the user. Messages are simple text messages, but they can also include richer components, such as images, videos, quick replies, and cards as needed.
- Use Message Variations: To provide a more conversational experience to your users, you can specify different message variations. For example, you might add the variations “Sure, I can help you with that” and “I’m happy to help you with that.” When you add message variations, the copilot randomly picks one of them to use each time the node is triggered.
- Add an Image: Images and videos can provide a great way to create a more enhanced and useful experience. For example, if you’re creating a copilot that helps with troubleshooting, you can use the image to display a picture of the item they’re troubleshooting or link to a video that provides help.
- Add a Basic Card: A basic card is a general-purpose card that you can use to add text, images, and interactive elements to copilot responses. When adding a basic card, you can define values such as Title, Subtitle, Image, Text, and Buttons.
- Add an Adaptive Card: Unlike basic cards that are static in the details they present, Adaptive Cards are platform-agnostic cards that you can tailor to your needs. When delivered to a specific app, the JSON is transformed into native UI that automatically adapts to its surroundings. For example, you could create a weather card that includes graphics and animations that display forecasts in more detail.
- View Multiple Cards in the Same Node: Sometimes you might need to have multiple cards displayed in the same node. For example, you might have multiple images that need to be presented to the user. When you add two or more cards to a node, you have two different display options: Carousel (displays one card at a time) and List (displays all cards in a vertical list).
- Use Quick Replies: Quick replies provide suggested responses or actions for the user. When a user selects a quick reply, it sends a message back to the copilot, making the interaction smoother and more efficient. Quick replies are shown in the chat history as if the user typed the message, and they disappear once another activity occurs.
- Work with the Topic Management Node: Each topic in your copilot is likely to be specific, such as a “current weather” topic providing weather-related data. However, topics can be related or dependent on each other. For instance, a “Recall or Return” topic can determine whether to load a “Product Returns” or “Product Recalls” topic based on user input.
- End the Conversation: The end of a topic often signifies the end of the conversation. The “End the conversation” node can trigger actions such as displaying a survey to gather user feedback or escalating the conversation to a live agent if needed.
- Use the Call an Action Node: This node allows you to execute actions such as sending emails, locating external data, or creating activities based on user input by calling a Power Automate Flow from the copilot.
- Branch a Topic: Branching turns a one-way path into a multi-layer conversation, ensuring the customer receives data and resolutions based on their specific situation. Branching can be manually added between nodes or occur automatically based on user responses.
- Create Topics from Existing Support Content: Use AI-assisted authoring to automatically extract and insert relevant content from existing web pages into your copilot. This feature saves time and ensures alignment with common customer issues.
- Manage Topic Status: Each topic has a status indicating whether it can be used in conversation. Non-system topics can be turned on or off, while system topics like greetings and escalations are on by default but can be turned off if needed.
- Work with System Fallback Topics: Fallback topics handle unrecognized input by guiding users back on track. Customize these topics to fit your needs, such as asking clarifying questions or providing category options.
- Reset a System Fallback Topic: If the fallback behavior isn’t suitable, you can reset it to its default state. This ensures the fallback topic functions as intended.
- Copy a Topic: Save time by copying existing topics and modifying them to fit new needs. This is useful when creating similar conversation paths with different trigger phrases or slight variations.
- Work with Topic Errors: The Topic Checker validates your topics and highlights errors or warnings. Addressing these issues ensures your copilot functions correctly and provides a smooth user experience.
- Use Sample Topics: Microsoft Copilot Studio includes sample topics ranging from simple to complex scenarios. These examples help you learn how to create content for your copilots and can be turned off or deleted as needed.
Conclusion
By effectively creating and managing topics in Microsoft Copilot Studio, you can build powerful virtual agents that provide personalized and efficient customer interactions. This not only enhances user experience but also frees up human agents to handle more complex issues. Microsoft Copilot Studio’s features, such as adaptive cards, Power Automate Flows, and AI-assisted authoring, offer advanced capabilities to further enhance your virtual agents.
Frequently Asked Questions (FAQs)
What are topics in Microsoft Copilot Studio?
Topics in Microsoft Copilot Studio are focused conversations on specific subjects. They include trigger phrases and conversation nodes that guide the interaction based on user input. Topics help structure the conversation paths that a virtual agent, or copilot, follows to provide relevant responses to user queries.
How do I create a new topic in Microsoft Copilot Studio?
To create a new topic, navigate to the Topics page in Microsoft Copilot Studio and click on “New Topic.” Define the trigger phrases that will initiate the topic and design the conversation path using conversation nodes. You can add messages, questions, actions, and branching to create a comprehensive interaction flow.
What are trigger phrases, and why are they important?
Trigger phrases are specific words or phrases that initiate a topic. They are crucial because they help the copilot recognize what the user is asking for and launch the appropriate topic. For example, phrases like “What are your hours?” or “Store hours” could trigger a topic about store operating times.
Is there a tutorial for Copilot Studio?
Yes, Microsoft offers extensive tutorials and documentation to help you get started and make the most out of Copilot Studio features.
How to get started with Copilot Studio?
Get started by completing this Microsoft AI Skills Challenge: Create agents in Microsoft Copilot Studio. Prompt Try this prompt in Copilot for Microsoft 365. This will assist you in learning the intricacies of developing conversational AI solutions using Microsoft Copilot Studio and in creating Copilot Studio actions that enhance the knowledge and capabilities of Microsoft Copilot for Microsoft 365.
How can I manage multiple topics in a single copilot?
You can manage multiple topics by organizing them based on their relevance and ensuring each topic has unique trigger phrases. Use the Topic Management node to direct users to different topics as needed. This helps create a seamless and natural conversation flow.
What are system topics in Microsoft Copilot Studio, and how do I use them?
System topics are predefined topics such as greetings, goodbyes, and escalations. They are essential for handling common interactions and can be customized to fit your specific needs. For example, you can personalize the greeting topic to include the customer’s name or provide specific information based on the time of day.
How do fallback topics work in Microsoft Copilot Studio?
Fallback topics handle unrecognized user input. If the copilot doesn’t understand what the user is asking, it can guide the user back on track by asking clarifying questions or providing category options. This ensures the conversation continues smoothly even when the bot doesn’t immediately understand the user’s intent.
Can I use existing content to create topics?
Yes, Microsoft Copilot Studio includes AI-assisted authoring, which allows you to automatically create topics from existing FAQ or support pages. This feature saves time and ensures that your topics are aligned with common customer issues.
What are adaptive cards, and how do I use them?
Adaptive Cards are platform-agnostic cards that can be tailored to your needs. They allow you to create rich, interactive content within your bot. For example, you could create a weather card that includes graphics and animations to display forecasts in more detail.
How do I handle errors in my topics?
Use the Topic Checker in Microsoft Copilot Studio to validate your topics and identify any errors or warnings. Addressing these issues ensures your copilot functions correctly and provides a smooth user experience. Errors need to be fixed to avoid unexpected behavior, while warnings indicate areas that could be improved.
What is the purpose of the “Call an Action” node?
Use the Topic Checker in Microsoft Copilot Studio to validate your topics and identify any errors or warnings. Addressing these issues ensures your copilot functions correctly and provides a smooth user experience. Errors need to be fixed to avoid unexpected behavior, while warnings indicate areas that could be improved.
#MSFTAdvocate #AbhishekDhoriya #LearnWithAbhishekDhoriya #DynamixAcademy
References & Read More:
- Copilot Studio Tutorial EP#1: Understanding What is Microsoft Copilot Studio? A Comprehensive Guide for Beginners
- Copilot Studio Tutorial EP#2: How to Add Knowledge to Copilots in Copilot Studio?
- Copilot Studio Tutorial EP#3: How to Create and Manage Topics in Copilot Studio?
- Copilot Studio Tutorial EP#4: What are Copilot Studio Actions? A Comprehensive Guide for Beginners
- Copilot Studio Tutorial EP#5: How to Publish Copilots in Copilot Studio and Analyze Their Performance?
